
How To Make An Open Pantry From a Closet
If you have a small kitchen that’s short on storage space, and are looking for kitchen pantry ideas, an unused closet may be the perfect place to create one! Today I am sharing how we turned a long narrow hall closet into a beautiful open pantry space with customized shelf spacing for optimal pantry organization.
Before we dive in, you need to know that we are not professional builders, in fact we are far from it! We’re just home owners who enjoy trying a little DIY now and then! This project began with me questioning whether this hall closet could be better used as an open pantry. If you are inspired to try something similar be sure to review local building and planning regulations, and safety guidelines to be sure the project works safely and is well suited for your own home.
Post Updated March 2026
Searching for Kitchen Pantry Ideas that Would Work in a Small Space
When you live in a small home you know how important it is that every square inch is used to its’ fullest potential! Especially in the kitchen!
Frustrated with the lack of kitchen storage space, I started searching for inspiration for DIY pantries that were suitable for small homes and small kitchens. I immediately noticed a trend to take unused or little used closet space and transform it into extra kitchen storage. Mind you, most of the examples I came across were proper enclosed closets, sometimes even a walk-in closets, with doors that were turned into lovely built-in pantries.
I knew a walk-in pantry or a pantry with doors was not in the cards. After seeing some great examples of open pantries, I was totally okay with the fact that we were going to have to make do with a smallish pantry without doors.
Why We Chose This Closet to Convert to a Pantry
After being completely inspired by all the lovely closet-to-pantry makeovers, I knew this was going to be best solution for us.
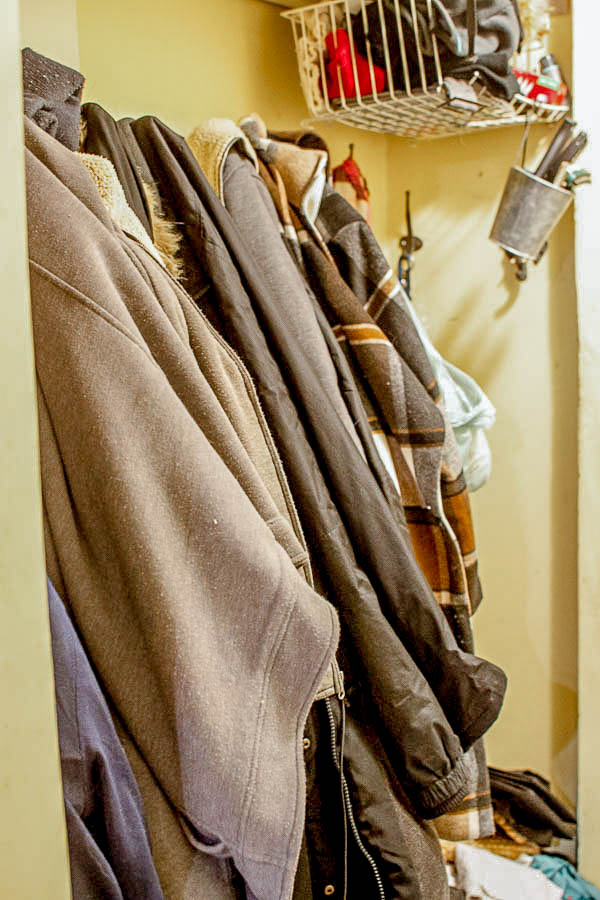
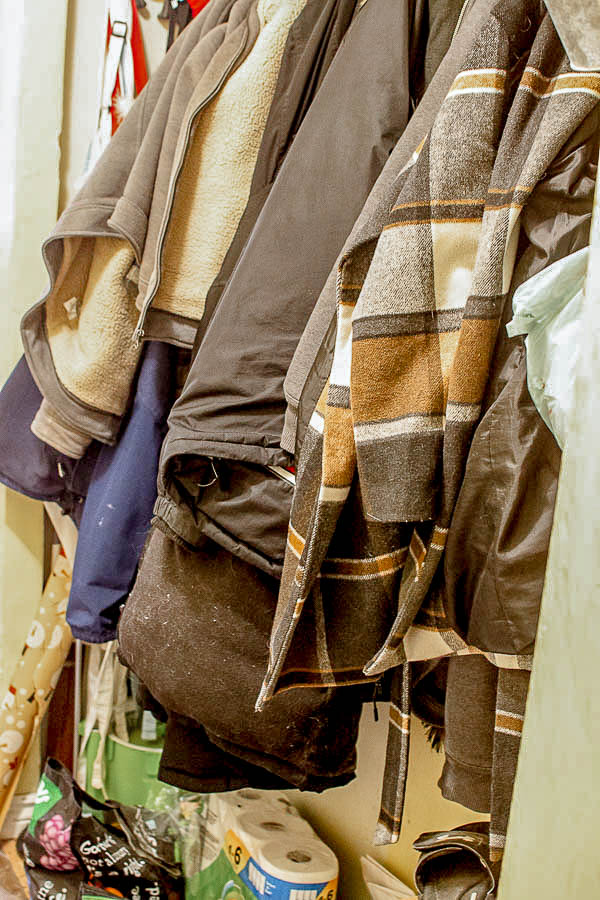
I have never loved this closet, as it’s not very deep. Its long narrow footprint didn’t allow for a rod and hangers, so it just had hooks, which I always felt looked chaotic. Given it’s location between the kitchen and the back door, it has always been used for coats, boots, shoes, etc., but also the place everybody put the “stuff” they didn’t know what to do with.
At one time it did have bifold doors, which constantly came off the tracks, and made the narrow hallway seem even more narrow than its’ 2 1/2 feet width.
However, given it was right off the kitchen, we agreed it would be the perfect space for our pantry.
The Closet Before
The Plan
As I mentioned above, we are not experts in any way, shape or form! And honestly didn’t spend too much time in the planning phase. Here is what we did plan before beginning:
- the budget
- the timeline to complete it
- the type of wood we wanted to use
- the basic construction and measurements of the “box” insert that would slide into the closet opening
- what exactly it would be used for other than food storage
Our DIY Closet to Kitchen Pantry Supply List
These supplies we used are based on measurements are specific to the size of our closet. You will have to measure and adjust the supply list for your own project.
- 4 foot x 8 foot x 3/4 inch plywood good one side cut to fit your project
- 4 foot x 8 foot x 1/4 inch MDF cut into 1 inch strips
- 1″ x 2″ x 8 foot spruce
- tongue and groove pine
- PL Premium Adhesive
- table saw (or circular saw)
- Brad Nailer and nails
- 2 1/2 inch wood screws
- Kreg Jig
- Paint (we used Fusion Mineral Paint)
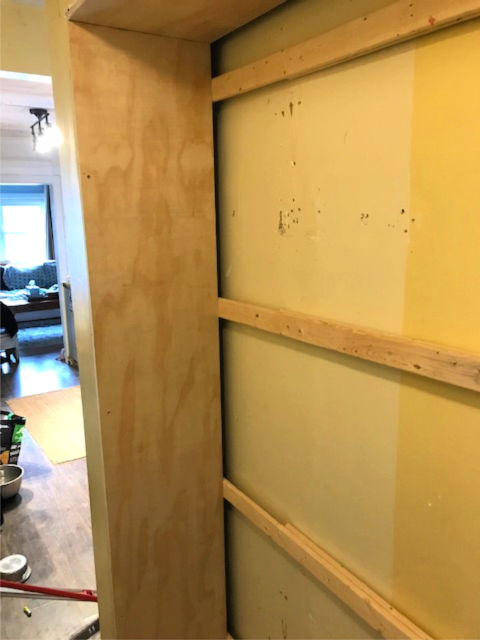
Building the Frame
It was a challenge to build the frame in such a small space! But, he did it! Building it outside was not an option. Given its’ size and the logistics of getting it up stairs and around tight corners it would not have worked.
The frame was made using 3/4 inch good one side plywood. It was cut to fit the exact height, width and depth of our closet opening.
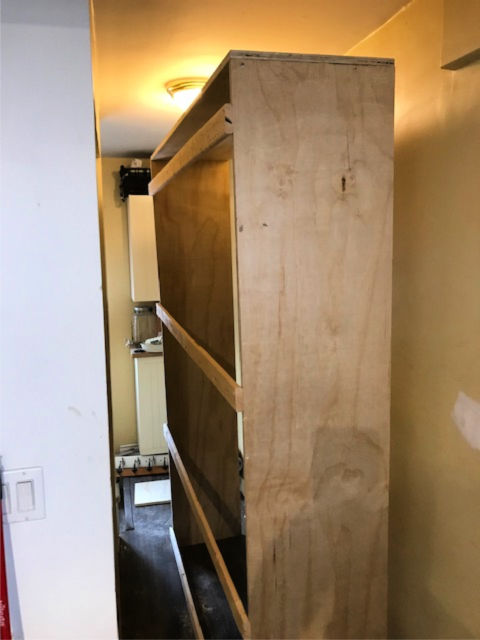
Once the frame was constructed, it was slid into place and secured it to studs inside the closet opening using wood screws. We wanted the pantry slightly less deep than the actual closet itself.
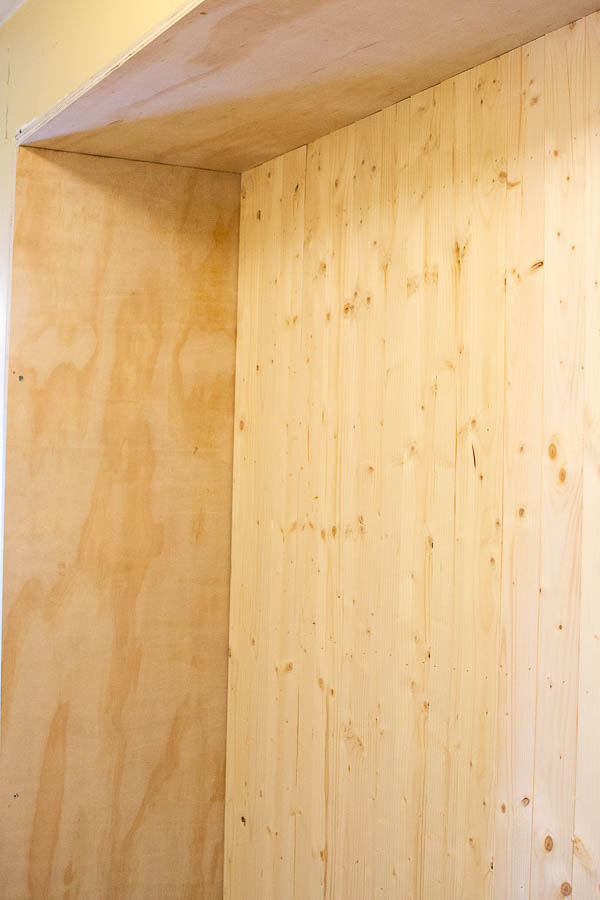
One by two spruce was attached across the back of the box frame. Then these were securely attached to the back wall of the closet. It also served to attach the tongue and groove pine. Solid plywood could also have been used across the back, but this option was much more cost effective, and gives it a rustic, cottage look.
The 2-1/2 inch by 8 foot tongue and groove pine came in packages of 10. We needed two packages.
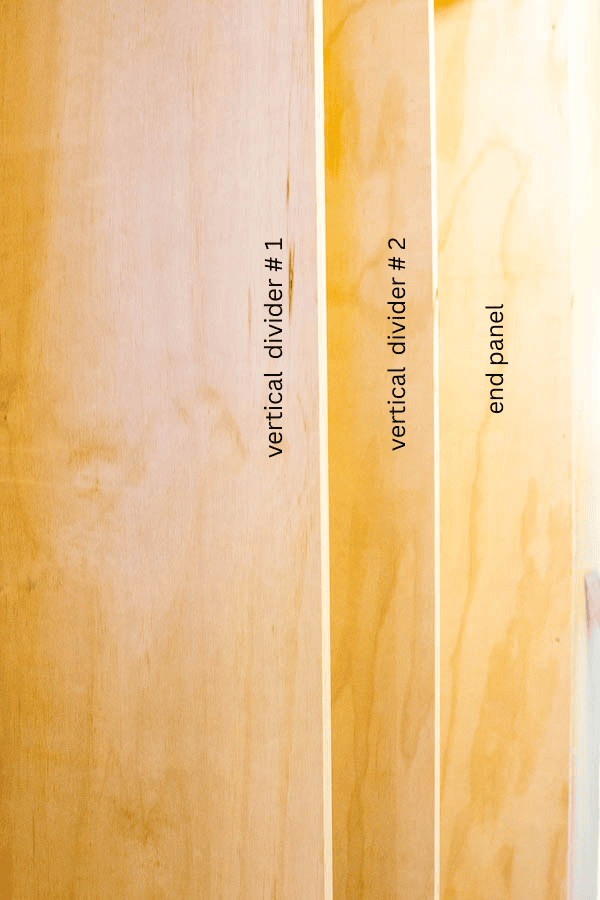
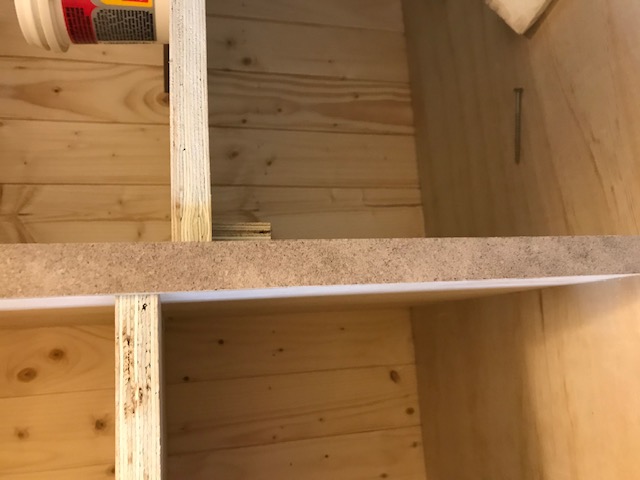
Adding Vertical Pantry Dividers
After the tongue and groove pine was in place, the two vertical dividers were put into place using wood screws. We used a counter sink drill bit on an angle to hide the screw. A Kreg jig would be perfect to hide the screws as well.
We opted to have 2 wide sections at either end of the pantry and a narrow section in the centre.
Open Shelving With Finished Edges And Framing It In
We measured out where we wanted to place the horizontal shelving based on the size of the jars, baskets, glassware, etc. we planned to store on them. The pantry depth only inches, so we didn’t need to install any pull-out shelves. We framed the entire pantry using standard door trim.
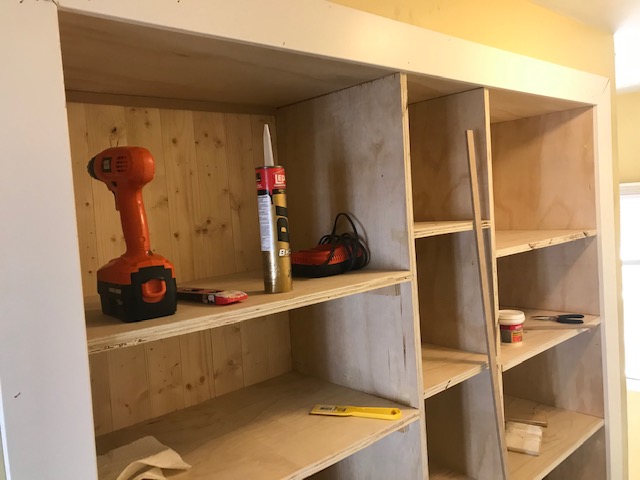
Offset Shelving
You will notice the centre section is narrower and shelves offset to those on either side. I just felt that shelves evenly spaced all the way across wasn’t the look that I wanted.
Finished edges
The front edges of the plywood were faced with 1″ strips of MDF to create a smooth front finish that could be easily painted.
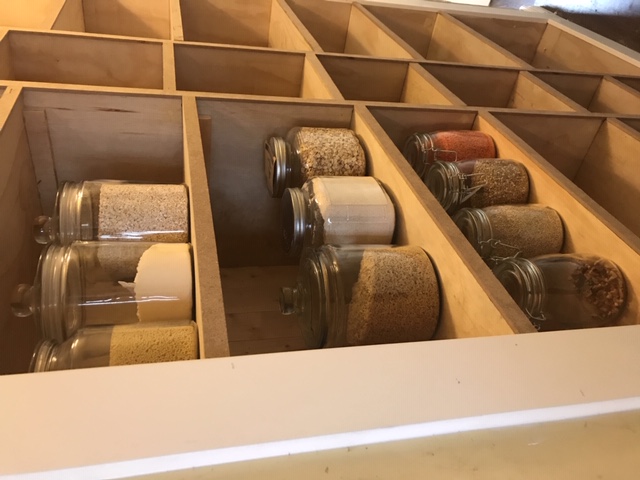
Testing the Shelf Heights
I did a little test with some of the clear containers I planned to use for food storage, just to make sure they fit as I liked them. It would have been one thing to make adjustments now rather than waiting until it was finished with paint!
We made the top shelves and the bottom shelves the tallest to accommodate my largest glass storage jars on the top and my picnic basket on the bottom.
Choosing Paint Colour
Choosing the paint colour was the hardest part. Well, the hardest part for me anyway!! I first thought about painting it white, or even black to add a bold contrast to the rest of hallway. White felt too generic and black would have made the overall hallway feel even narrower than it already is.
In the end, a friend suggested green, and given that is one of my favourite colours, I just needed to find the RIGHT shade of green!
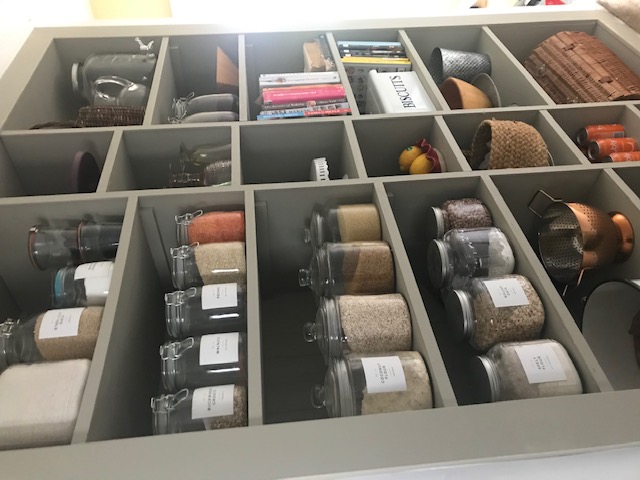
I found the exact colour I was looking for in Fusion Mineral Paint – Bedford. It is actually considered a grey, but definitely is more on the green spectrum.
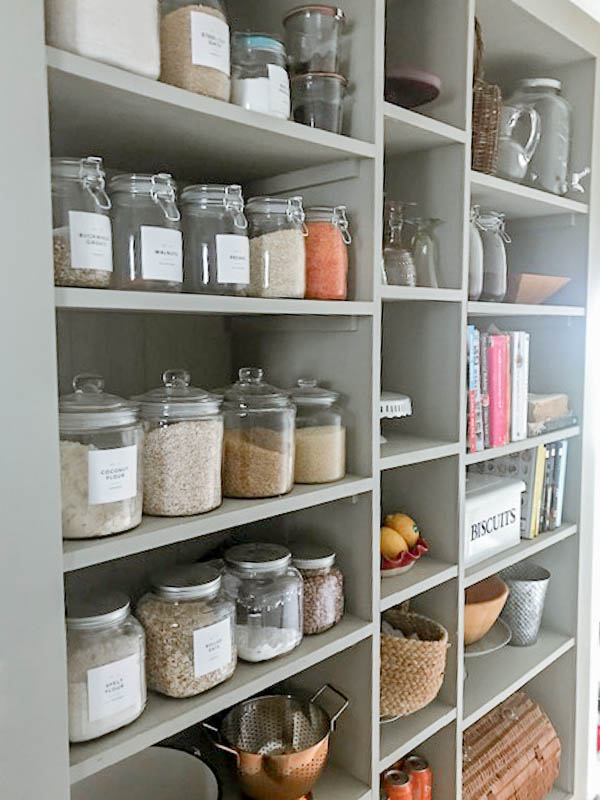
The Before and After of Closet Turned Open Pantry
Oh my gosh! I am so happy to finally have the extra storage. And, to have it right off the kitchen has made life so much easier!
The coat closet served its’ purpose for many years, but it was time for a change!
What a difference! Again, the lighting and small space makes it hard to get great photos, but I am sure you can get the idea of how much better and most importantly, how much more functional this open pantry is!
How I Organized My Pantry
A well organized, well stocked pantry is cooks best friend! Here are a few ways I organized my pantry to make it work for our family.
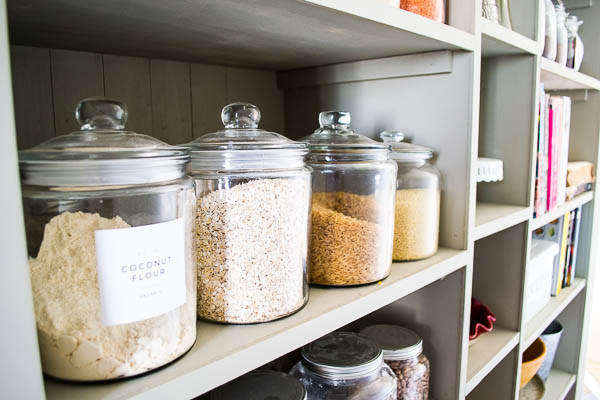
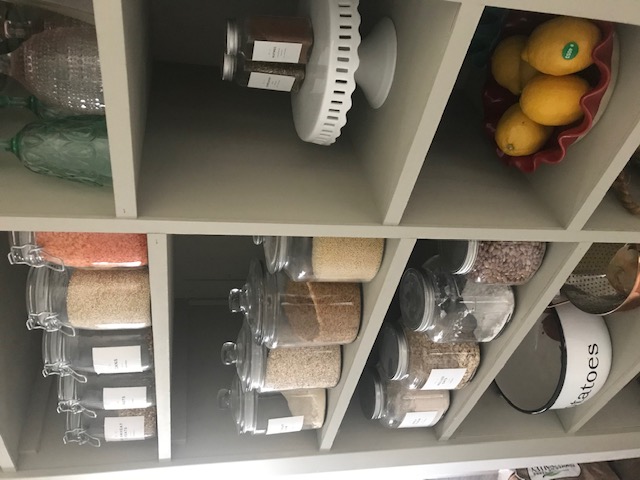
- clear storage jars with labels are used to hold dry goods making it easy to see when supplies are running low, and are placed nearest the kitchen so I can simply grab what I need when I am baking a batch of muffins or prepping for dinner
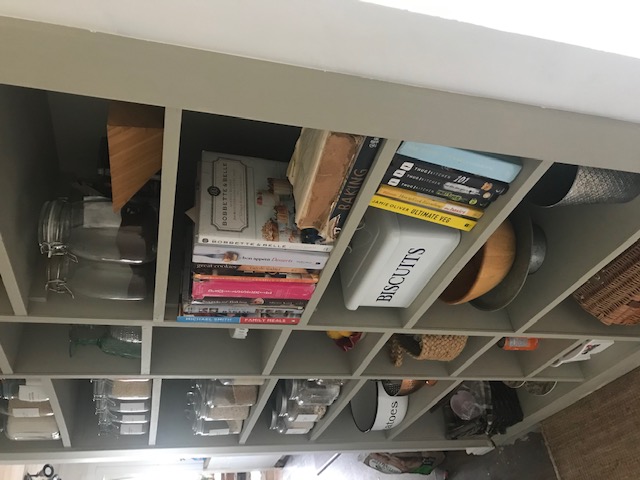
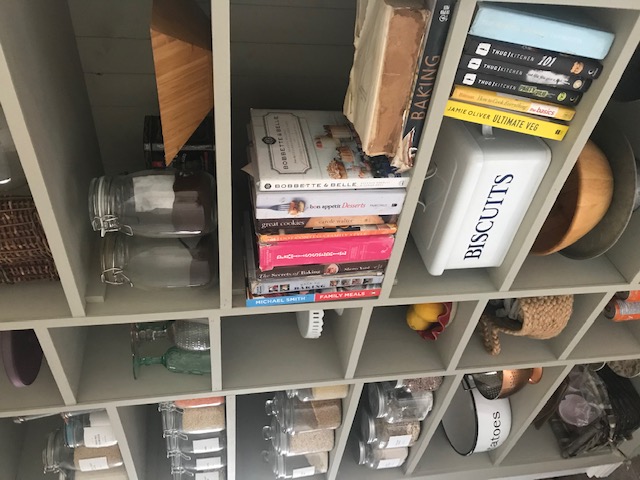
- the narrow centre section holds cake plates, stemware, fresh fruit that doesn’t need refrigeration, cans and bottles of flavoured water, and other small kitchen items
- baskets and bins are used to hold linens and miscellaneous items I wanted to tuck out of site
- at the far end I placed coffee and tea, as that is nearest the coffee station
- also furthest from the kitchen are my cookbooks, salad bowls, picnic basket and outdoor serving pieces, and my tin biscuit keeper, and things I don’t always use every day
Pros and Cons of Converting a Closet to an Open Kitchen Pantry
I love the look of an open pantry, but I knew there would be a few “cons” that not everyone will want to live with.
Pros
- ease of grabbing things quickly when needed
- open shelves make it easy to keep it neat and organized
- custom shelving heights for our unique needs
- adding much needed storage space to our small kitchen
- better use of an oddly shallow coat closet
- the open shelves give the illusion that the hallway is wider than it actually is
Some of the pros listed above can also be considered cons depending on your own situation
Cons
- loss of coat closet space
- open shelving requires the shelves are kept neat and organized for visual appeal
- open shelving can collect dust that requires frequent dusting and/or vacuuming
- the actual work involved in doing the conversion, although it can easily be contracted out if you don’t want to or can’t do it yourself

The first place I looked was Pinterest, as it has a wealth of inspiration ideas. I also pursued some of my favourite magazines looking specifically at featured kitchens for design ideas.
When storing food in the pantry, air tight containers are essential. Look for glass or food safe BPF free plastic storage containers with lids that seal. For smaller things like nuts, seeds or loose candy, Mason jars are great options.
Yes, provided it is dry and easily accessible to the kitchen, and can safely and securely hold shelving with heavy items.
Not securely attaching shelves to studs is a big mistake, as well as providing ample support to each side of the shelves. Another mistake is not measuring the size of your containers, baskets, appliances, etc, that you will be storing and hence not having enough height between the shelves. Making shelves too deep is also a design mistake to avoid as it makes it easy for things to get “lost” when they are too far out of sight!
Transferring dry goods to glass storage containers, using baskets to hide items you don’t want on display, storing canned goods in organized rows. Wire organizers for cans or plastic spice organizers are bonus additions to an open pantry to help keep it looking tidy.
I hope we have inspired you to look to for those lesser used or poorly used closets and nooks in your own home that can be repurposed into functional storage!
Other Kitchen Pantry Ideas
If you don’t have a closet to convert or can’t afford to loose that coat storage, here are a couple of other options to create a “pantry”:
- use a small armour if you have the space available to add one
- repurpose an old hutch or barristers bookcase by adding it to your countertop for additional storage
- add additional space to existing cabinets by using wire shelving that can placed on an existing shelf, essential creating two shelves out of one for a low cost option


Hi Maureen! You and your husband did a great job changing this closet into a pantry!!! This is a perfect color, too. It doesn’t shout for attention but looks good. Enjoy it!!!
Happy decorating,
Barb 🙂
This pantry looks fantastic ! Love Fusion Paint and love that you used the Bedford colour. What an amazing use of space! So much more storage! Wonderful job that you and Tim did!
MAUREEN!!!! (yes…I just yelled that!) Your pantry is so very wonderful! The Bee’s Knees of Pantries, for sure. I love the color and your jars look so great, and your cookbooks, and your cakeplates…truly…do you just pinch yourself everytime you walk by?
Well done to you and hubby!
Oh my gosh!! It’s stunning! Truly Pinterest-worthy! I thought the after picture was one you were using as inspo but it’s actually your new pantry! Amazing job
Aww! Thank you! It certainly has made a huge difference for my tiny kitchen 🙂