
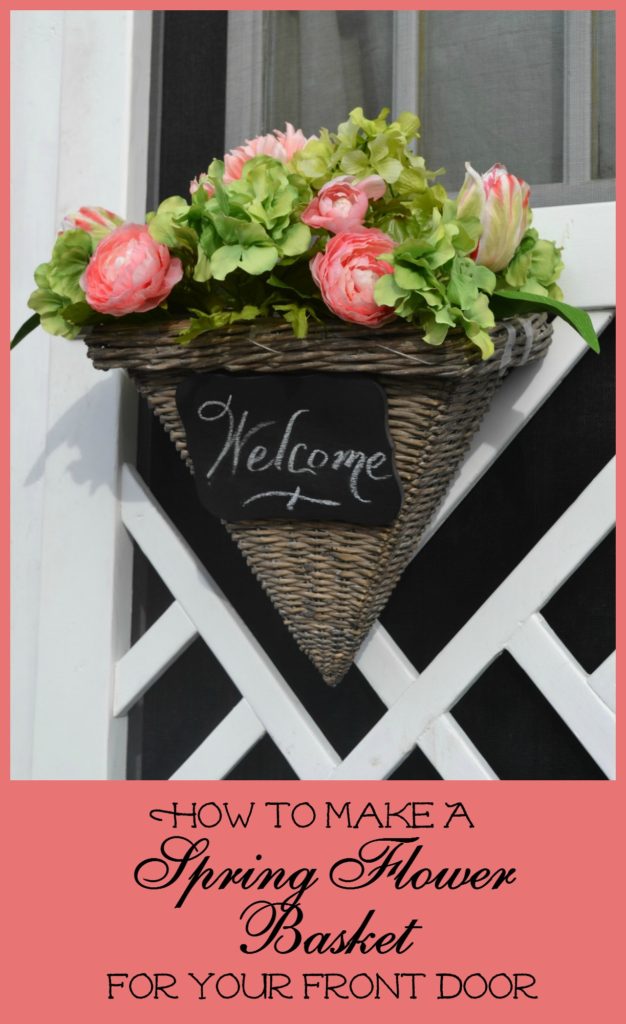
How to Make a Spring Flower Basket for your Front Door
While I consider Autumn my favorite season, come March I am more than ready to welcome spring into my home. Yes, I love the coziness that fall brings but I equally love how with the arrival of spring comes fresh air, vibrant colour and days that grow longer the closer spring gets.
There is no better way to welcome the change of seasons than with a spring wreath adorning your front door. This year I decided to make a bit of a change and decided to fill a basket with gorgeous colourful flowers to hang on the door instead of a typical wreath.
I started thinking about making this arrangement about a week ago and I had the perfect basket in mind. Several years ago while visiting Paris (sadly not the Paris in France), we happened upon a little gift store where this wicker basket caught my eye. It was displayed hanging on a wall with a faux Boston fern in hit. I brought it home knowing I would one day find a use for it. I stored it in our coat closet and it ended up getting filled with all kinds of stuff. Plastic bags, tools, dog leashes. Not exactly what I intended to us it for.

Fast forward to yesterday when I went to find my basket and it was nowhere to be found. I may or may not have had a little temper tantrum. I waited over four years to find the perfect use for this basket and now I couldn’t find the darn thing.
Just when I resolved to just use an enamelware jug, my Knight in Shining Armour came out of the shed holding the basket, proud as punch that he found it for me. He is my hero!
Without further adieu, I am happy to share with you how you can make a spring flower basket for your front door.
You will need wire cutters to cut the artificial flower stems to length.
Choose a vessel. A flat backed basket works best. An antique wicker fishing basket would work well too!
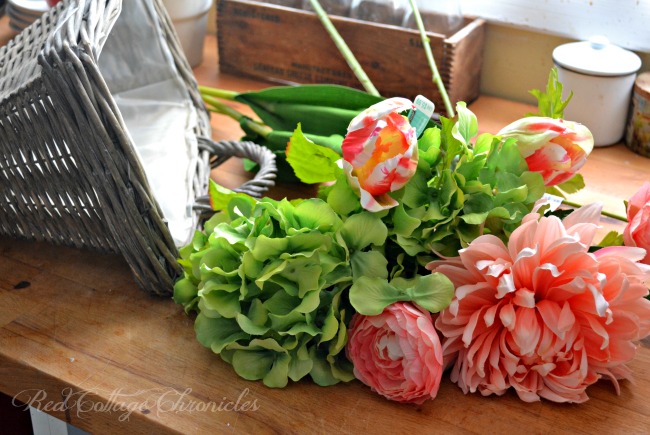
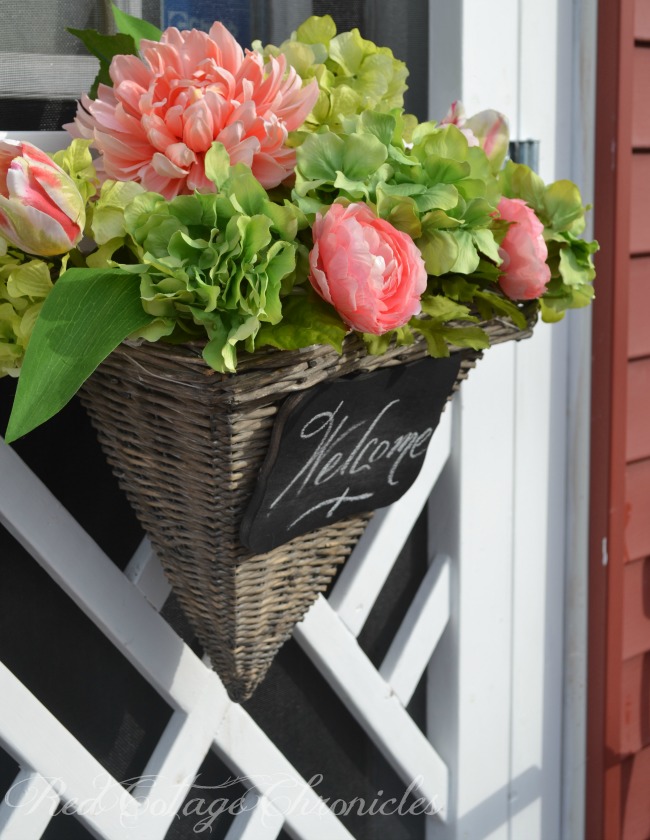
Choose your flowers. To fill my basket I used 1 “bush” of hydrangea’s that had 5 stems in lime green, 2 single hydrangea stems in a slightly different shade of green, 2 stems of ranicula’s with one large and 1 small bloom in a peachy pink, 2 single tulip’s, and one large bloom which I think is a dahlia also in a peachy/pink colour. You can always bring your basket with you when you choose your flowers to make sure you buy the right amount.
I bought all my blooms at Michael’s when they were on sale for 30% off, plus used an extra 15% off all purchases coupon. Total cost was $28.00.
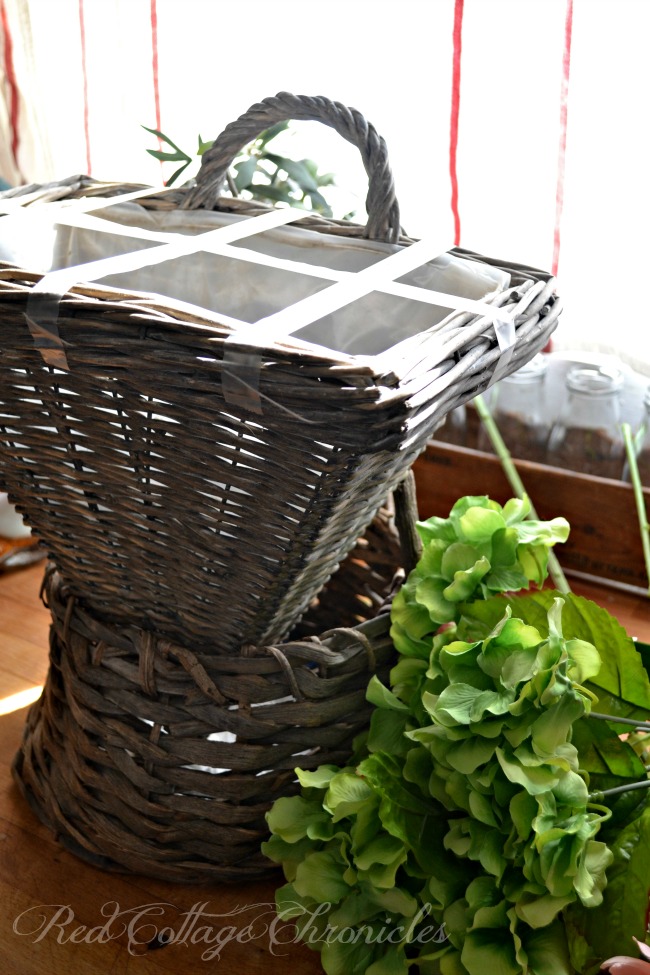
Since my basket was coned shaped, I set it into another basket to keep it upright making it easier to design the flower placement.
You will want to tape the top of your basket with floral tape in a grid pattern (unless you are like me and forgot to buy it, in which case you can use scotch tape!) . This aids in holding the flower stems in place. Because my basket was so deep, I also stuffed a bit of bunched up newspaper in the bottom to add some stability to the stems.
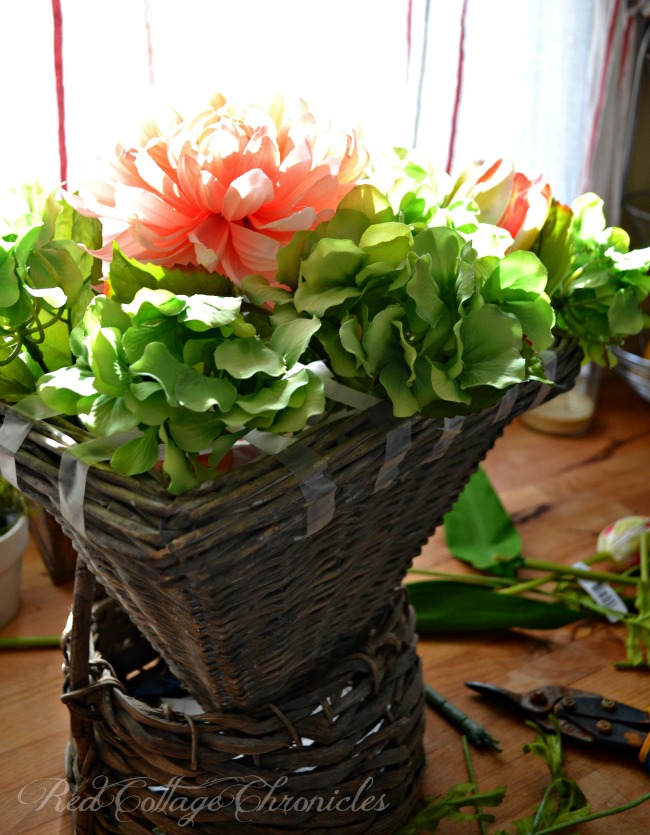
Since the green hydrangea’s were the most prominent flower in my basket, I started by cutting them to length and placing all of them in the basket dividing them between the grids to evenly fill the basket.
I then added the large single dahlia bloom just off set from center. I cut that stem a bit longer than the hydrangea’s to give it some extra height.
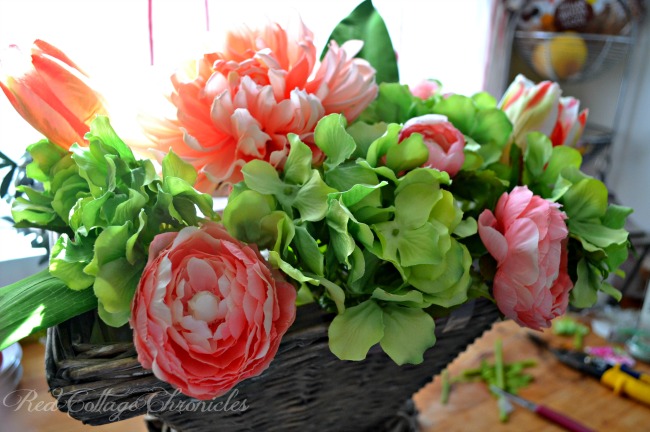
Continue adding the other blooms into the arrangement, scattering them throughout until you are pleased with the design. Again, I cut some the same length as the hydrangea’s and some just slightly longer. I bent some of the stems to get them to sit exactly where I wanted them.
I used some cut off stem pieces and taped them to the tips of the extra tulip and ranicula leaves to add in as filler. Giving them a long stem keeps them securely in the basket.
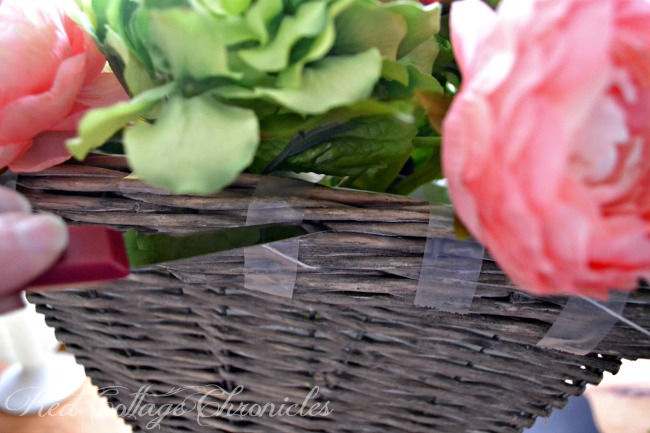
I trimmed the long pieces of tape with a paring knife, but you can avoid this by using shorter pieces of tape in the first place. Make sure you trim all the pieces of tape, not just the ones in the front, before you hang it on your door and take pictures of it! What can I say, it was a long day!
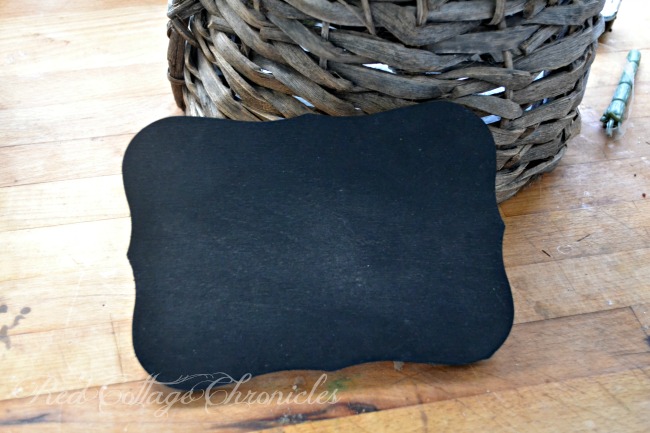
I had this little wood sign leftover from another project, which I had spray painted with chalkboard paint. I glued it with hot glue to the front of the basket to create the “Welcome” sign.
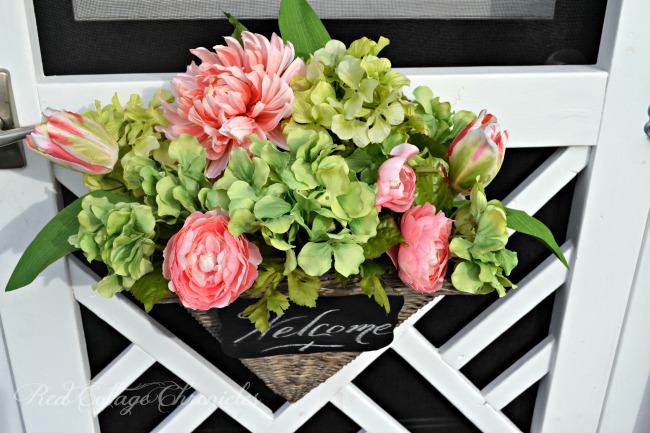
I didn’t want to put any screw holes in the DIY front door we made last summer, so I used an ‘S’ hook to hang it on the top cross bar. If you don’t have a screen door like we do, you can just use a standard wreath hanger to secure it to the door. My basket had a loop already on the back of the basket, but you could easily use wire threaded through the basket to create a loop if your basket doesn’t have one.
There you have it! A beautiful basket of colourful flowers to welcome spring into your home.
I really couldn’t be happier with how it turned out. I am especially pleased with the colours I decided on, considering I went in thinking I wanted pinks and purples. Those lime green hydrangea’s were just calling my name.
Are you ready to try something different than an ordinary spring wreath for your front door? Grab a basket and some pretty silk blooms and welcome spring into your home!
Want even more spring inspiration? I am Partnering with Hometalk today for DIY My Spring. Check out all the links below for fun DIY spring projects! And, don’t forget to visit me on Hometalk
Until next time..
Maureen
With lots of projects coming up, you won’t want to miss a single one. Why not join the Red Cottage community. Simply add your email address below. Only receive an email when a new post goes live!
<!– end InLinkz script →


Maureen, I Love it!! I love the colors you chose…very welcoming and spring-y. Visiting from the blog hop. #DIYMySpring
So pretty! Love the basket!!!
Thank you Lindsay! I am so glad we found the basket!
So pretty Maureen! I love this idea so much I gonna “borrow” it! I have the perfect basket to use. Pinning!
Thanks Jeanie! I want to see pictures when you are done 🙂
Very pretty and I love the colors that you chose!
Thank you Maria! I am thinking I need these colors in my garden too!
Really pretty, and a great way to have the flowers all be perfectly set up. The colors are beautiful!
Thanks Emily!
I love how fresh and pretty this is. Perfect for spring 🙂 Great job.
Thank you Sue 🙂
I absolutely love this and am happy to know that I’m not the only one that stuffs lots of stray items in places that they don’t belong. I’ve found scarves, gloves and an occasional earring in baskets and bowls. Thank you for the tutorial, I need this! I would love for you to join us at Celebrate Your Story Link Party. Here is the link if you’re able to.
http://www.thesweetsensations.com/chocolate-sponge-cake-celebrate-your-story-link-party/. Have a fun day and hope to see you there!
Thank you Sandra! I will pop over and add my link 🙂
Wonderful door hanging!!! What a great basket. I love chalkboard to leave a message for guests too. I think they are an absolute must on the front porch. Thanks for such a wonderful idea!!
Thank you Michele! I never thought of using a chalkboard to leave messages for guests! What a great idea 🙂
What a beautiful bouquet basket for the front door and the chalkboard sign is a nice touch on the front of it! I am going to start decorating my front porch this weekend for the Spring, I can’t wait!
Carrie
curlycraftymom.com
Thanks Carrie! Mother nature is teasing us with temps near 70 degrees. That was enough for me to get spring started early!
Thank you so much Maureen for sharing this at Celebrate Your Story Link Party. I’m off to the thrift store today and hope I can find a basket like this one. Hope you’ll join us again next week!
What a beautiful basket of flowers, and a great way to welcome everyone who comes to your front door. That was a good tip about stuffing newspaper into the bottom. That would really help the stems to stay in place.
Thanks Rebecca! The newspaper seems to be doing the trick as we had a really windy day this week and the flowers didn’t budge!
Sorry I’m late with the hop visit, Maureen. (Painting kitchen cabinets this week… ugh)
BUT… I had to tell you I’m so stealing your basket. (Need your address) 😉
Your spring door decor is truly a beautiful touch and love the tutorial and tips! Thank you for the idea (that I’m totally doing)! Pinned and shared!
Hugs~
Thanks so much Robin! I am still going through all the amazing links. So much inspiration!
This is lovely! Love the little chalkboard touch and such a great tutorial and tips for those with limited floral skills (moi) Pinning 🙂
Visiting from the blog hop
Cheers!
Wow, my mother will absolutely love this post! She loves flowers very much, even her mom, that is why she was named after a flower, Rose. Even without any event, every time she’ll visit us, she always brings us flower baskets. Oh my, I missed my mom so much!
Oh my goodness! I love that your Mom brings you flower baskets! That is the best 🙂
Hi Maureen, I think you’re starting a trend! I love fresh flowers in wicker for the front door too! Thank you for sharing this great post!