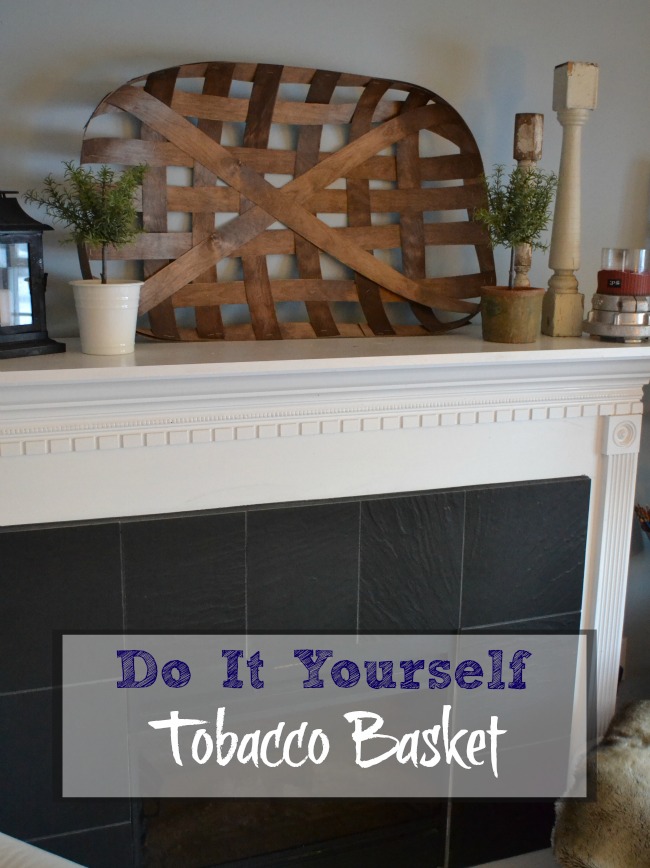
• Red Cottage VIP Printable Library
    • Email
    • Facebook
    • Instagram
    • Pinterest
    • Twitter

Red Cottage Chronicles

All Things Home

  • Home
  • About
    • Work With Me
    • Contact
    • Legal Stuff
  • Recipes
    • All Things Sweet
    • Appetizers and Dips
    • Mains and Sides
    • soups & salads
    • vegan/vegetarian
  • Around the Home
    • Housekeeping/Homemaking
    • Home Decor
    • Tablescapes
    • flowers and wreaths
    • gardens
    • Seasonal, Holidays & Special Occasions
  • DIY
    • One Room Challenge
    • Thrift Store Upcycle Projects
    • Seasonal, Holidays & Special Occasions
    • DIY Renovation Projects
  • Lifestyle
    • Explore Niagara
    • Family
    • health and well being

DIY frugal living mantels

DIY Tobacco Basket


Country Living January/February Cover tobacco basket inspiration

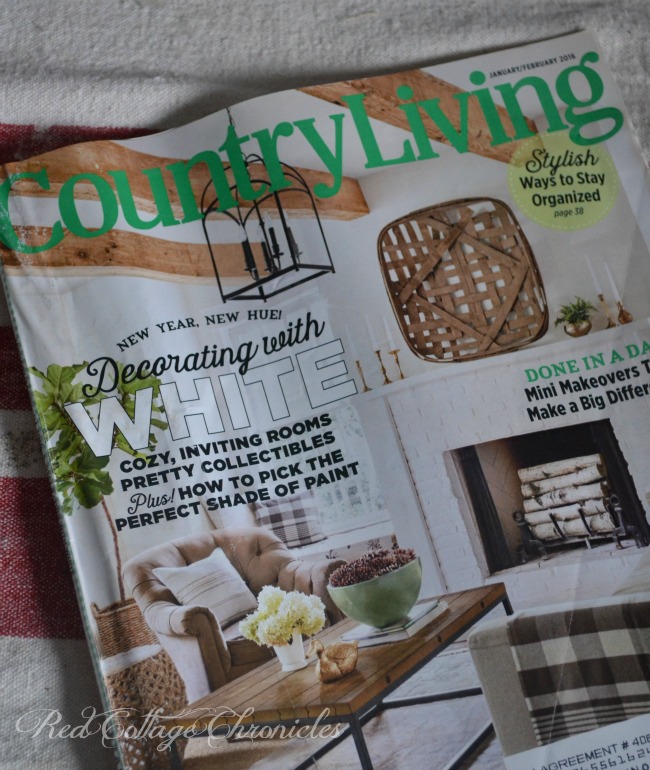
When the latest issue of my favorite magazine, Country Living, arrived and I saw that beautiful Tobacco basket hanging above the fireplace I was immediately reminded of how much I wanted one for myself.

And also just how expensive they can be.

I had come across two or three last summer at different antique stores and just couldn’t justify the $75 to $100 price tag.  Not to mention they weren’t really big enough to fill the space over my mantel.

A tutorial to make an easy DIY decorative Tobacco Basket

Quite awhile ago I had pinned a tobacco basket tutorial on my DIY I can do Pinterest board and now was the time to click over and have a look at what exactly the project would entail.  Being the impatient person that I am I skimmed through real quick to see what materials were used and get a general idea of how it went together and then headed to the home improvement store.

It turned out to be a fairly easy DIY and didn’t take long at all.  In fact, I had it all finished in an afternoon.  It probably would have been even quicker if I had actually looked at tutorial a little closer. I would have realized she stained the laminate prior to cutting it!

I decided to use Birch Veneer has I liked the wood grain pattern better than the Oak Veneer the tutorial had recommended. I purchased a roll at Home Depot.  Here in Canada it was $16.99 for a roll that was 12 inches wide by 99 inches long.

For this project you will need:

  • Roll of wood veneer (make sure it is not pre-glued)
  • Sharp utility knife
  • measuring tape
  • ruler or other straight edge
  • wood stain of your (colour) choice
  • brush or sponge to apply stain and rag to wipe the stain off
  • standard stapler (and of course staples!)

A simple project with a big impact. A DIY decorative Tobacco Basket

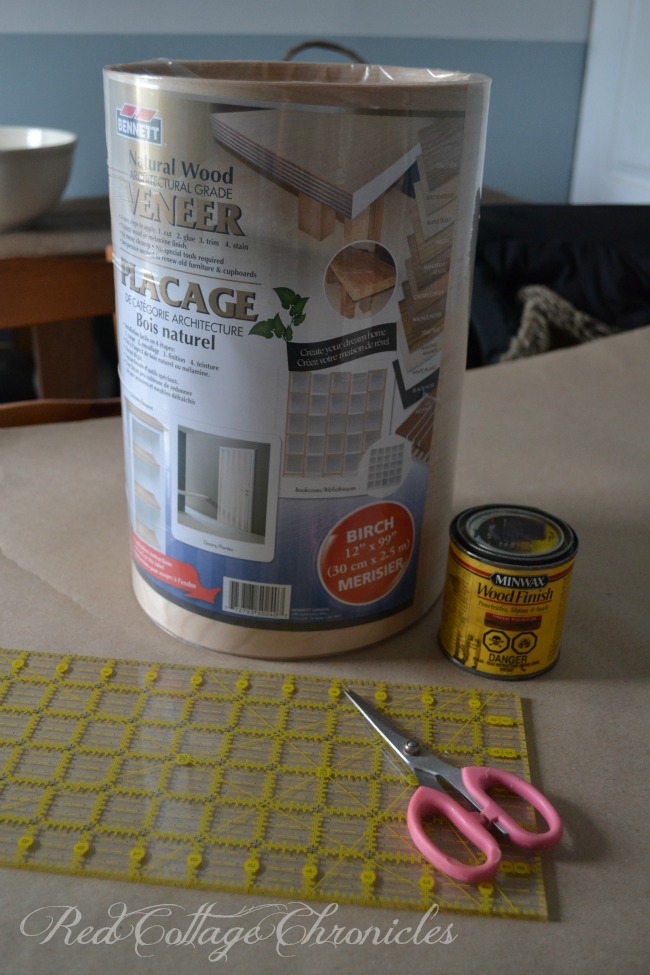
I already had a sample pot of the stain left over from our DIY hardwood floors.

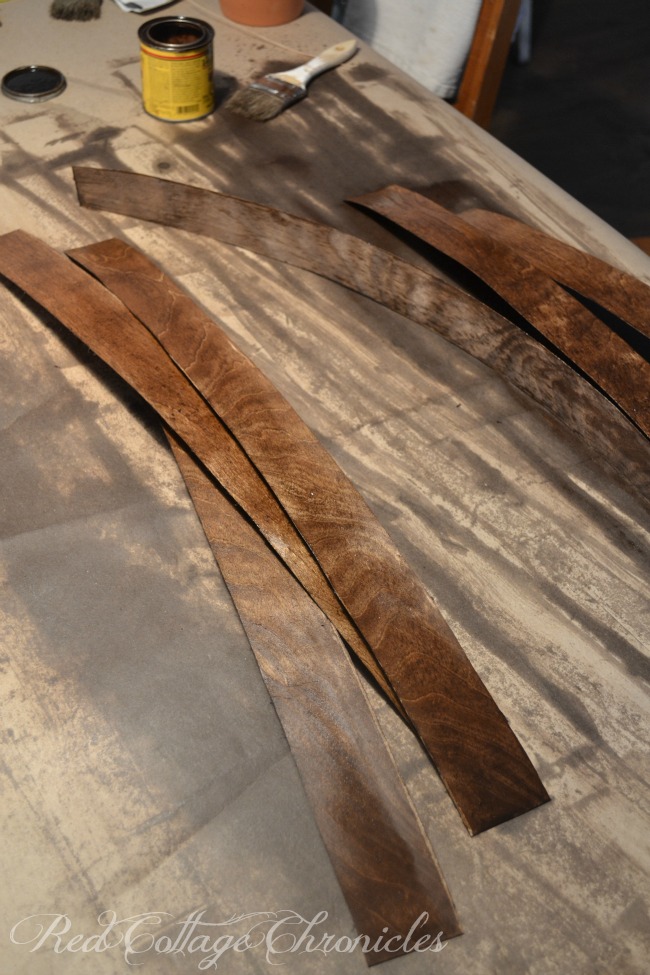
As I mentioned, I am not one to be known for the finer details when it comes to instructions and tend to wing it after I do a quick once over, hence I missed the fact that she stained the veneer before cutting.  I cut the strips first and then stained them.  It really didn’t take that long but I think it was a bit messier with all the little strips instead of staining one solid sheet.

A DIY Tobacco basket made with Birch Venner from the Home improvement store

Birch Veneer DIY Tobacco Basket Tutorial

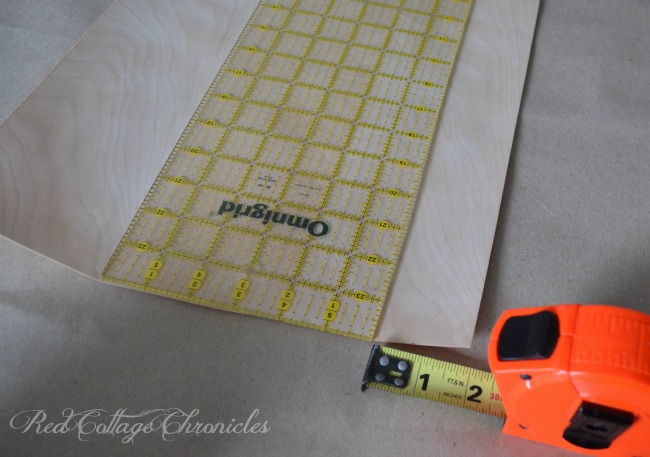
For my basket I cut the strips 2″ wide.

I then cut 6 strips to 24″ long and 11 at 36″ long.

I stained them, both sides of course, and left the stain on for about 5 minutes before wiping off the excess with an old rag.

Birch Veneer DIY Decorative Tobacco Basket tutorial

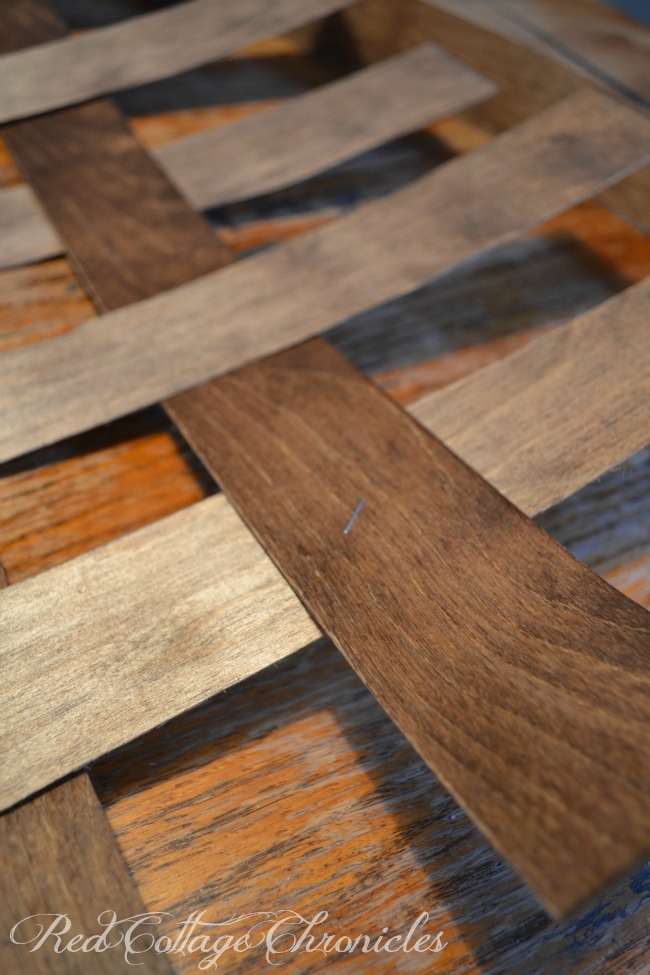
I laid out the long (horizontal) pieces of the table and then wove the short (vertical) strips, ensuring the spaces between each row was somewhat even.

I wasn’t going for perfection, but still wanted it to be pleasing to the eye.

Once I had the under/over pattern of the weave in place I then straightened and evened them out. (the photo below is definitely before I straightened them all out)

Birch Veneer DIY Tobacco basket tutorial

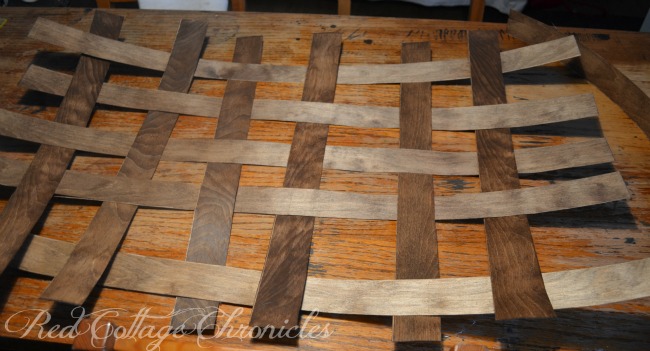
One staple at the end of each row was all that was necessary to hold the weave in place.

Easy DIY tobacco basket tutorial

The next step was the trickiest part.

First, set two long strips aside

Use the remaining long strips of veneer to form the basket edge.  It required a bit of patience and again, I wasn’t going for perfection and was okay to see the veneer split in one or two places as I worked it around the edges, stapling each woven strip to the edge strip as I went around.  After all, I did want it to look like it has been around and well used for many years.

Just be sure to overlap the ends of the edging strips a couple of inches as you go.

Once the edge is complete and secured all around use the two strips you set aside to form an ‘X’ across the centre of the basket and use one staple at each end to hold in place.

If you brush a little stain over each staple it helps them blend in a bit better.

An easy DIY decorative tobacco basket tutorial

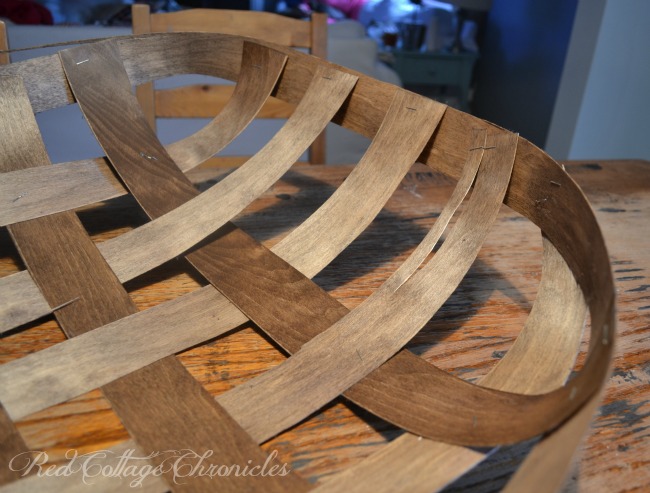
(as you can see in the photo above, I stapled the long woven strips to the edge as I worked around to secure it in place)

When I had the edging all in place and I laid the “basket” on the table it didn’t lay flat or even, and one side was up off the table higher than the other.

Instead of stomping my feet and declaring it a fail I decided to give it a very light spray with water from a spray bottle and place two heavy cookbooks inside to get the bottom of the basket it sit flatter.

Birch DIY tobacco basket tutorial

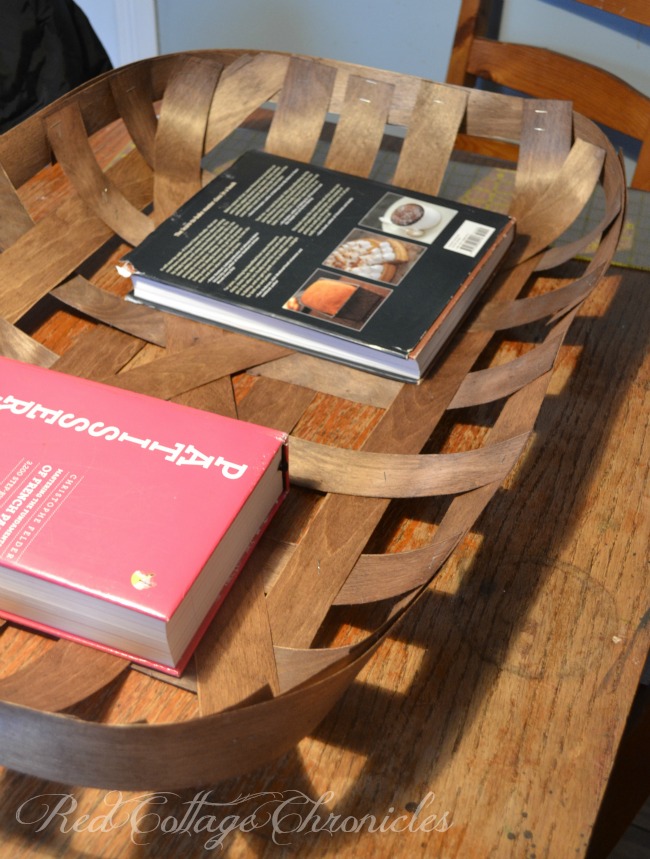
I let it sit like this for the better part of two days and it worked like a charm.

While I won’t be laying this flat on a table too often, it did need to sit relatively flat against the wall above the fireplace.

An easy DIY decorative tobacco basket tutorial

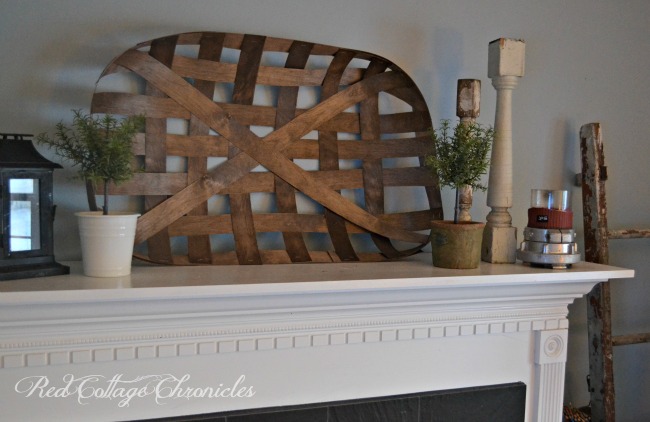
It really fills the space nicely and I can’t wait to style the mantel around it throughout the seasons.

Keeping in mind this is a more decorate piece, and not as “substantial” as the antique tobacco baskets I have been admiring, the less than $20 price tag of this one made it the perfect decorative choice.  I didn’t have enough veneer left to do add another layer of “edging” around the inside edge of the basket, but will do that when I pick up another roll as I plan to make a smaller one for my dining room table.

Feel free to make the basket whatever size makes sense for your space.  Just cut your strips in lengths that are appropriate.

I love how every basket I make will be unique, just like all the different ones I have seen in the various antique stores and markets.  I don’t think I have ever seen two exactly the same.

If you want to see the original post that gave me the know how to try it myself, you can find it here!

Until next time….

Maureen

Looking for more DIY inspiration, recipes, and gardening ideas?  Follow Red Cottage Chronicles on Facebook !


(Visited 2,235 times, 1 visits today)


16 Comments

Subscribe

Get all the latest news from our little red cottage straight to your inbox!

« Skillet Blueberry Slump
My Sisters New House – Renovation Up-Date »

Comments

  1. Heather @ New House New Home says

    January 14, 2016 at 8:13 am

    Great job! I saw the Country Living cover and lusted after the tobacco basket too! You’d think I could find one nice and cheap as I live right in tobacco country here in SW Ontario. But I don’t see them too often and they are expensive! Pinning your tutorial so that when I have time (and the inspiration), I’ll make my own too!

    Reply
    • Maureen says

      January 16, 2016 at 7:08 am

      Thanks Heather! It’s the same for me with trying to fine a decent priced wine barrel living in the middle of wine country!

      Reply
  2. Linda says

    January 14, 2016 at 9:57 pm

    This is beautiful. It looks like one you paid a lot for! Thanks for sharing. I may be inspired!

    Linda

    Reply
    • Maureen says

      January 16, 2016 at 7:09 am

      Thank you Linda! I would love how it turns out if you decide to make one 🙂

      Reply
  3. Leilani says

    January 15, 2016 at 10:08 am

    Excellent work! I’ve been seeing these all over magazines and blogs. Interesting to see what takes off. And what a hefty price tag! What a great fake-out!

    Reply
    • Maureen says

      January 16, 2016 at 7:10 am

      Thanks Leilani! Gives my house a bit of a country feel, which I am loving right now 🙂

      Reply
  4. Rachel says

    January 16, 2016 at 3:05 pm

    Genius! I just love this! I’ve been loving these tobacco baskets but you just can’t find them in our area. I may have to make one.

    Reply
    • Maureen says

      January 18, 2016 at 7:57 pm

      Thanks Rachel! I would love to know how you make out if you give it a try!

      Reply
  5. Jennifer says

    January 26, 2016 at 6:53 pm

    Great idea! Thank you for sharing : )

    Reply
    • Maureen says

      January 27, 2016 at 9:21 am

      Thanks! Happy to share 🙂

      Reply
  6. Kathy Massee says

    February 3, 2016 at 6:36 pm

    Hi Maureen! Love the basket! I’ve been eyeing one that’s $100, but would love to make my own…how do you determine the lengths of the strips if you want a different shape other than rectangular?

    Reply
    • Maureen says

      February 7, 2016 at 4:03 pm

      I just measured the space I wanted the basket to fit, and cut the strips about 4 inches longer (to allow for the curve up to the rim). So if you want to make a square basket, say 36″ on all sides, I would suggest cutting the strips about 40″! Hope that helps 🙂

      Reply
  7. Meghan says

    March 2, 2016 at 1:57 pm

    I live in the states and I’m having trouble finding wood veneer. Any suggestions?

    Reply
    • Maureen says

      March 2, 2016 at 6:58 pm

      Hi Meghan! Here is a link to something similar from Amazon.com. It doesn’t look like it is pre-glued and says it is real wood, so that should work. http://www.amazon.com/White-Wood-Veneer-Rift-Sheet/dp/B009KN97H0/ref=pd_sim_sbs_60_10?ie=UTF8&dpID=51FSt8kGrgL&dpSrc=sims&preST=_AC_UL160_SR160%2C160_&refRID=02Q4XTR7WGYR8YTY5HXG

      Reply
  8. Ruby says

    March 22, 2018 at 8:17 am

    Oooowwww so excited! I love these. But yes. Way too spendy for me. Im gunna try make one. I like the way you say you’re not going for perfection. I don’t do that either! 😉 But yours looks great.
    I’ll let you know how it goes. Thanks

    Reply
    • Maureen says

      March 22, 2018 at 8:29 am

      Thank you Ruby! I still love my basket and use it in many different rooms throughout the year! Would love to know how yours turns out!

      Reply

Leave a Reply Cancel reply

Your email address will not be published. Required fields are marked *

Red Cottage Chronicles

Oh, hi there!

Well, hello! I am Maureen, and welcome to our little Red Cottage. Married to my high school sweetheart, I am a passionate baker, accidental DIY'er and love all things home! Read More…

Follow Us!

  • Facebook
  • Google+
  • Instagram
  • Pinterest
  • Twitter

Stay updated!

Get all the latest news from our little red cottage straight to your inbox!

Categories

Instagram

redcottagechronicles

redcottagechronicles
Introducing our new little bean!! Falcon Lake’s Introducing our new little bean!! Falcon Lake’s Jingle Bell Rock!! Otherwise known as Dasher!!! Can you tell we love Christmas!! He will join the family in about 3 weeks!! So excited!! #goldenpuppys #goldenretrieverpuppy #puppylove
A very Merry Christmas to all! When the snow start A very Merry Christmas to all! When the snow started to fall last night this girl was a very happy camper!! #whitechristmas #letitsnowletitsnowletitsnow #snowmakesmehappy #perfectday
My sweet boy is out like a light after spending a My sweet boy is out like a light after spending a spa day @fetchme.later  He always comes home looking fabulous and happy to be all fluffed and buffed!! #adogslife🐾❤️ #sleepinglikeadog #goldenretrieversofinstagram #goldenlove #lovemygoldenretriever #letsleepongdogslie #christmasready🎄
A sparkly Christmas tree makes me happy!! And, fro A sparkly Christmas tree makes me happy!! And, from what I am seeing not only on social media but also right here in our neighborhood #, folks are decking their halls early this year! Twenty-twenty has been quite a year, and anyway I think people are looking for a way to add a little joy into their lives! Today on the blog I am sharing this, my Victorian inspired Christmas tree, plus links to 27 other inspirational trees!! Link in my bio! And, if decorating for the holidays is too soon for you or you don’t decorate at all, that’s okay, but I encourage you to find a little thing to light up your day!! #christmasdecor #victorianchristmastree #holidaydecor #sparklythings #christmastreedecorating #victorianmagazine #hgtvcanada #dowhatmakesyouhappy #christmasinniagara #styleathomemagazine #canadianlivingmagazine #englishcountrystyle
The living room Christmas mantel is almost finishe The living room Christmas mantel is almost finished!! Instead of buying new garland I used inexpensive garland I have had for several years and embellished it with faux green stems bought during a 2 for 1 sale, and beautiful silk garden roses I already had!  Best part, I can reuse all the elements and create something new next year!  #christmasmantle #fauxgarland #victorianmagazine #repurposedchristmas #handmadechristmasdecorations #christmasdecor #countrylivinguk #nutcracker #pinkchristmasdecor
Our Thanksgiving may be behind us here in Canada, Our Thanksgiving may be behind us here in Canada, I am joining my American friends in sharing some inspiration for Thanksgiving table decor! I am leaning towards the simple things these days and this table reflects that! See the entire post through the link in my profile! #thanksgiving #tabledecorideas #autumntable #easycenterpiece #inspiredbynature #simplelife #homedecor #styledtablesaturday #styledtable #thanksgiving2020
Love autumn in Niagara! #autumncolours #notl #chan Love autumn in Niagara! #autumncolours #notl #changingleaves #niagaraescarpment #niagaraparkway #secretpaths #walkinginthewoods #leafcoveredpathways #redcottagechronicles
Having an outdoor socially distanced birthday cele Having an outdoor socially distanced birthday celebration with my “bubble”! @samantha__38 used my Cricut Explore 2 to make me a fan to “blow out” my candles!! #happybirthdaytome #fabulousat55 #birthdayfun #cricutmade #cricutexploreair2 #cricutcreated #genius #covidbirthday2020 #daughters #cricutcrafts
Decisions. Decisions!! #oneroomchallenge #bedroomr Decisions. Decisions!! #oneroomchallenge #bedroomrefresh #warmgray #benjaminmoore #graypaintcolor #upholsteredbed
Long Sunday morning strolls are so relaxing! Doesn Long Sunday morning strolls are so relaxing! Doesn’t get much better than autumn in #niagara
With 2020 being the most ridiculous year ever it i With 2020 being the most ridiculous year ever it is easy to feel defeated, sad, fed-up, and overwhelmed. I try to find a way to elevate the every day, and y’all know how much I love my fresh flowers!  These gorgeous hydrangeas cut from my garden this morning will bring a smile to face for days to come. And, remind me how blessed I am to have a safe spot to land when the world outside seems too much to handle. #hydrangeasmakemehappy #home #cozy #autumndiningroom grooom #freshflowers #flowermagazine #frommygarden #elevatetheeverday #bigflowerarrangement #simplebouquets #falltabledecor #falltabledecor
Went on our annual trek to go apple picking at @wi Went on our annual trek to go apple picking at @windwoodfarms  It has been a tradition for the last 8 years! That means apple recipes in the blog this week! #applecake #applepickingseason #autumntraditions #applerecipes #niagaraapples #appledesserts #freshpickedapples #bakingfromscratch #autumndesserts #beamsvillebench #passionatebaker #oldfashionedrecipe
Load More... Follow on Instagram

tablescapes

tablescapes

One Room Challenge Kitchen Edition

Budget Kitchen Renovation

STAY UP TO DATE

Get all the latest recipes straight to your inbox

Disclosure & Privacy Policy

Disclosure & Privacy Policy

More From Red Cottage Chronicles

A peek inside a gorgeous backyard secret garden

A Secret Garden – A look inside the ultimate private backyard oasis!

Trader Joes

Cross Border Shopping Favorite Finds

Memory Art

The ‘Art’ of Preserving Memories

Grilled Pizza

Puff Pastry Fruit Tarts

Copyright © 2021 · Site by Pretty Pink Studio

This site uses cookies : to enhance your user experience Find out more.