
Sealing Butcher Block Countertops
(This is not a sponsored post and I was not compensated to shared my opinion of Watco Butcher Block Oil, however I have included affiliate links for your convenience and ease of finding the product(s) I used)

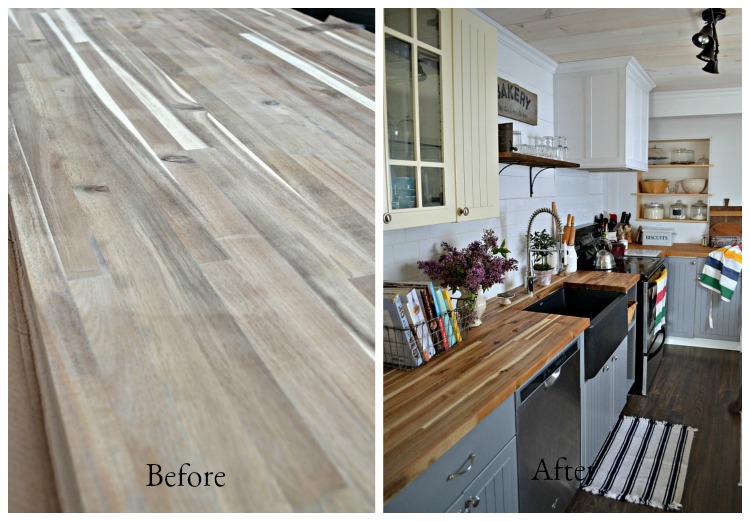
(before sealing)
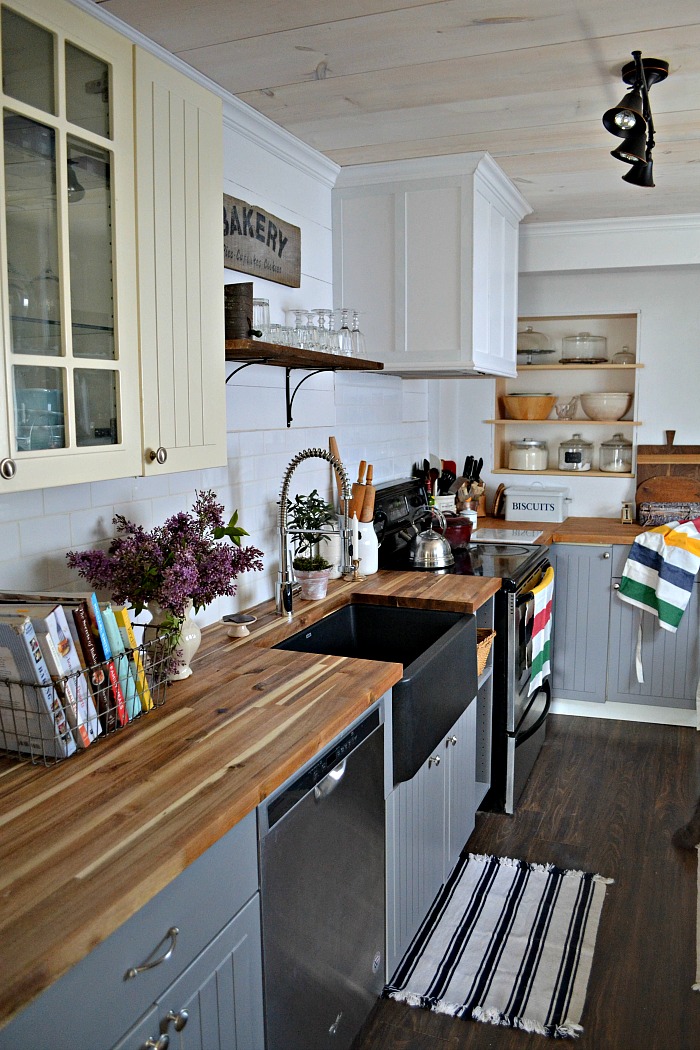
I have had a lot of inquiries about what we used to seal our butcher block counter tops, as well as how I like having a black sink ever since they made their debut in this post.
Sealing these butcher block countertops couldn’t have been easier. I didn’t think to photograph the process as it really was rather mundane! I can however share the process I followed.
I used Watco Butcher Block Oil for the job. We do not treat our counters with kid gloves. If you have been visiting Red Cottage Chronicles for a while you will know I have a passion for baking. That means my counters get used a lot, and I do not have the time (or memory for that matter) to think about not letting my food touch the counter tops.
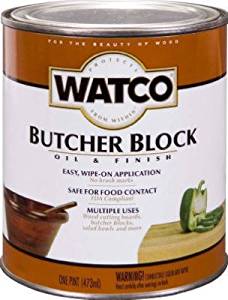
Choosing a quality treatment for our countertops was of the utmost importance. Especially since we were installing a farmhouse sink which is under mounted, possibly exposing the butcher block edges to water splashing up from the sink. When it came to searching for the best treatment to protect the butcher block, food safety was also at the top of the list.
I also wanted a treatment that easy to apply AND with easy clean-up! Watco checked all the boxes.
How to seal a butcher block countertop
- After a light sanding, wipe away any dust using a tack cloth
- Protect your hands with disposable rubber gloves
- Use old cotton rags to wipe on the first coat and leave to dry about 6 hours
- Before applying the next coat give the countertops a light sanding, and remove dust with tack cloth
- Apply 2nd through 4th coats repeating as above
- After final coat, allow 72 hours before using the countertops for any food prep
It is a good idea to do a light sanding and add a coat or two every 6 months or so. This will ensure the ultimate protection and long life of your new counters.
The result will be beautiful rich butcher block countertops you will love!
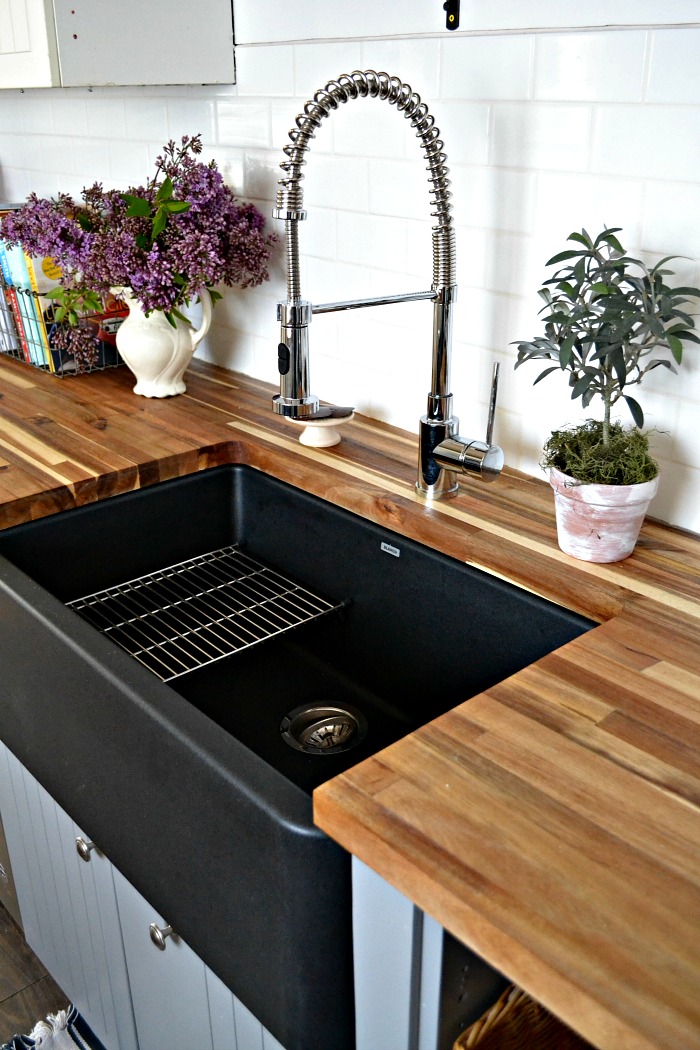
The other question I have gotten a lot is how I like having my Blanco Silgrant Ikon black farmhouse sink, and whether or not it shows water spots.
I absolutely adore my sink. A bit dramatic maybe, but I still am thrilled at how big it is, hence how many dishes it fits. Oh, and that optional rack. I use it daily! It is the perfect perch for rinsing fruits and veggies!
As far as water spots, that has not been a problem at all. I do tend to give my sink a quick wipe down after I use it, but even when I haven’t done that, I don’t see any visible spots. We don’t have hard water, so perhaps that helps, but water spots are a non-issue I am happy to report!
Until next time…..


Maureen these butcher block countertops steal the show in your kitchen and that is saying a lot because it is a kitchen full of beauty and character. Glad to see your tutorial on how to seal them. I’ll be pinning this one because you never know when you’ll need it.
Your countertops look beautiful!!
I recently purchased some acacia butcher block for our kitchen counters and have been struggling to decide the best way to seal them. I am also looking for something that is food safe but holds up to lots of daily use (although I do not plan to cut food on them). I have read a lot about Waterlox, but heard that it has a VERY strong odor….as I plan to seal these indoors while it’s cold, I am trying to avoid that. I have seen this watco sealer and wondered how well it would work so thanks for your great post! Does it have a strong odor like Waterlox?
Also, what kind of wood is your countertop made of? The color looks great!
Thanks!
Thanks so much Ashley! Our countertops are also acacia wood as well, purchased at Lumber Liquidators. I really didn’t find that the Watco had an overpowering odor when I applied it. I will be reapplying it again soon, as I like to reapply every six months or so!
Your home is beautiful! Thanks for your tutorial about butcher block! That is exactly what I want.
Pretty simple, I love the look. I have planning to install a new cabinet and butcher block countertops and now I will take your project as reference .
How has the butcher block held up right around the sink? We are racking our brains on how to seal this – we have an island w/ sink and maple butcher block…
Did you seal the underside of the countertops? Or just top and sides?
Hi Jill! We did seal the underside of the countertops around the sink area. Otherwise just the top and all the sides.
Maureen, do you feel it’s necessary to apply that many coats? Our butcher block is very old and I’m not too sure i want it that dark. I just want the protection. Yours is beautiful!
Thanks you Jill. I tend to be a “safety girl” and over do things! You could probably do with less, but may need to reapply more often. If your butcher block is near a sink I would definitely do more coats. To be honest, it has been my experience with the type of wood we have, it didn’t darken up too much. But, you might want to start with 1 good coat and see what you think. Good luck!
Your butcher block is beautiful. I wanted the natural light color so I didn’t want to stain mine. I applied 3 coats of the Watco Oil and Finish then 3 coats of then oil. It is blotchy and looks worn but it’s brand new, raw butcher block. What did I do wrong?
I wish I had an answer for you. We didn’t use any additional oil on our countertops, just light coats of the Watco butcher block finish, and letting it sit between coats. If there was any noticeable excess we wiped that off with a soft cloth. Ours our acacia wood countertops and I don’t know if the type of wood makes a difference or if it is the wood grain you started with. I know we have sanded off spots that have gotten really stained and retreated again with the Watco. Not sure if that would be an option for you.
We are getting ready to install birch plank counter tops . The planks have been drying for 10years or so. Do you think this product will work.
Does this darken the wood any I was going to stain ours then add a sealer but I’m not sure if I should if I’m going to use it for food prep I hate the glossy look so poly is not for me thanks
It does darken it just slightly. If you want a much darker colour, this doesn’t give you that result. Hope that helps!
Do you cut food on the counter? I’ve always just used mineral oil to seal, which is safe to cut on, but there’s no sink adjacent. In my new kitchen the sink and butcher block are together. The wood is maple. fwiw.
I have done so in a pinch, but I do have several large wood cutting boards at the ready!
Hi There,
I am about to seal my new butcherblock counters using this product/ technique (thanks for sharing!)…
Did you use an electric palm sander in between coats, or just hand sand it?
🙂
I just gave it a light sand by hand!